Dynamic Relief
Page Contents
Dynamic Vs Sculpting Relief
Designing in Basify is divided into 2 major steps:
- Dynamic Relief: Set your relief dimensions, position your Depthmaps and 3D models, and setting refinement detail level (polygons of the final model). Any setting or member of the Dynamic Relief can be changed at any time.
- Sculpt Relief: creates a 'snapshot' of the Dynamic Relief, which you refine using Blender's Sculpt mode. Correct anatomy mistakes, balance relief elements, smooth egdes, etc. You can use Basify's easy-sculpt tools, or native Blender brushes.
Within a single Blender file, you should only have 1 Dynamic Relief and 1 Sculpt Relief. The Sculpt Relief can be converted into a regular, non-Basify Object, if you want to compare multiple sculpts in the same Scene.
Add the Scene's Dynamic Relief
Delete the unneeded Objects in your Scene (only to reduce clutter). Open the right-side-menu in the 3D viewport by clicking the small arrow, or Pressing 'N' when your mouse hovers in the 3D view. Click the "Basify" tab, then "Make New Relief".
Dynamic Relief Settings
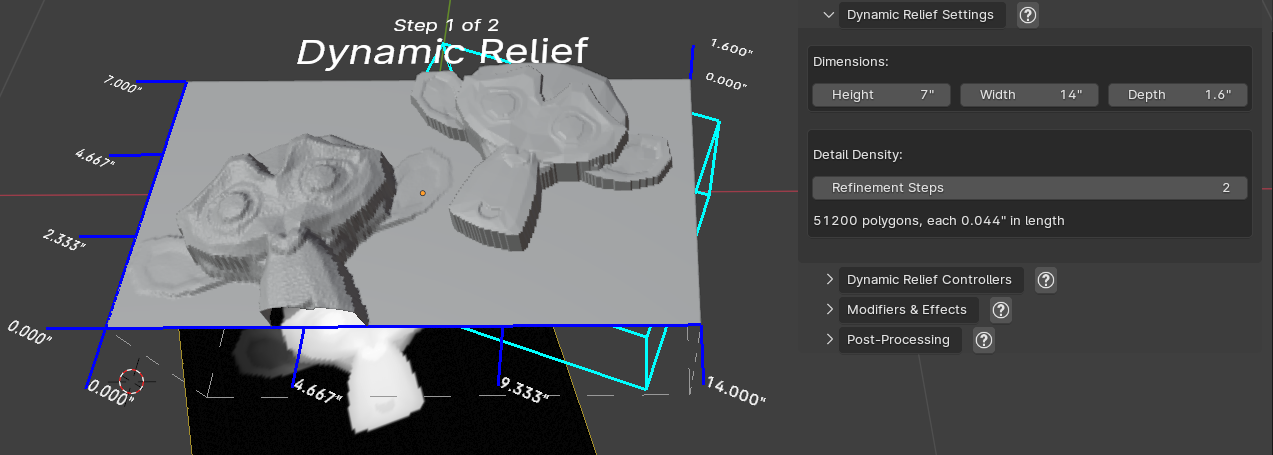
Relief Dimensions
Updating the Width, Height, or Depth updates the Dynamic Relief in realtime.
Basify attempts to maintain neat square polygons no matter the input dimensions.
As the width & height changes, Basify will maintain base polygon count between 10,000 & 40,000 when Refinement Steps = 0.
Detail Density / Refinement Steps
Each increment of this value increases the polygon count exponentially. This slider's range is 0 - 6, but you can type a value up to 8. Even for new & powerful computers, this causes Blender to drastically slow down.
NOTE On less powerful computers, a high value may cause Blender to freeze and crash. Don't slide this value to the max without saving first.
This menu also shows polygon count and length of the average square side
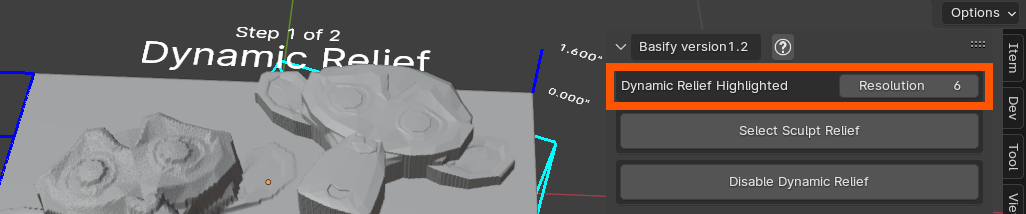
When the Dynamic Relief is selected, this field is also available at the top of the Basify side-menu panel
Adding Depthmaps to the Dynamic Relief
Depthmaps are greyscale images, with black pixels meaning height=0, and white pixels meaning height=full.
They can be generated from a source image with AI tools like Marigold or SculptOK.
To add them, open the Relief Controllers -> Depthmaps Panel in the Basify menu, then click "Import Depthmap from File".
When added to the Dynamic Relief, Depthmaps can be positioned and Scaled along the X & Y axis. Select them, either in the 3D viewport or the Scene Outliner, to access their options.
NOTE If you struggle to select a Depthmap Image in the 3D viewport, click the border instead of the center
Adding 3D Models to the Dynamic Relief
Any Mesh, 2D Curve, or Text object in your Blender Scene can drive changes to the Dynamic Relief. To enable this, click Relief Controllers -> Meshes.
Select one object, then click Create from Mesh. For most uses, you will choose the Use Original Object option.
Each Mesh Controller is be wrapped in a Lattice Object (The purple rectangle), which is used to rotate & skew the mesh. You can also move / rotate / scale the Lattice itself.
The Probe Depth option tells the Dynamic Relief how far down the Z axis to search more Mesh data. The grey dashed lines represent the probe depth
Tips & Tricks
Exact Sizing of Depthmap Controllers
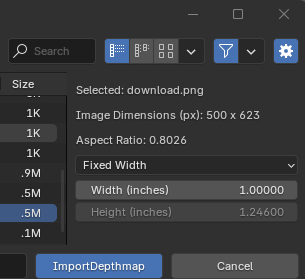
When importing Depthmaps, the file chooser lets you specify the exact size of a Depthmap when added to the Scene, while adhering to the image's aspect ratio. This is useful for ensuring Depthmap perfectly fills the Dynamic Relief.
There are 3 options when importing Depthmap images:
- Fixed width: locks height
- Fixed Height: Locks width
- Fit inside Relief: Scales Depthmap to fit inside bounds of Dynamic Relief
Exact Sizing of Mesh Controllers
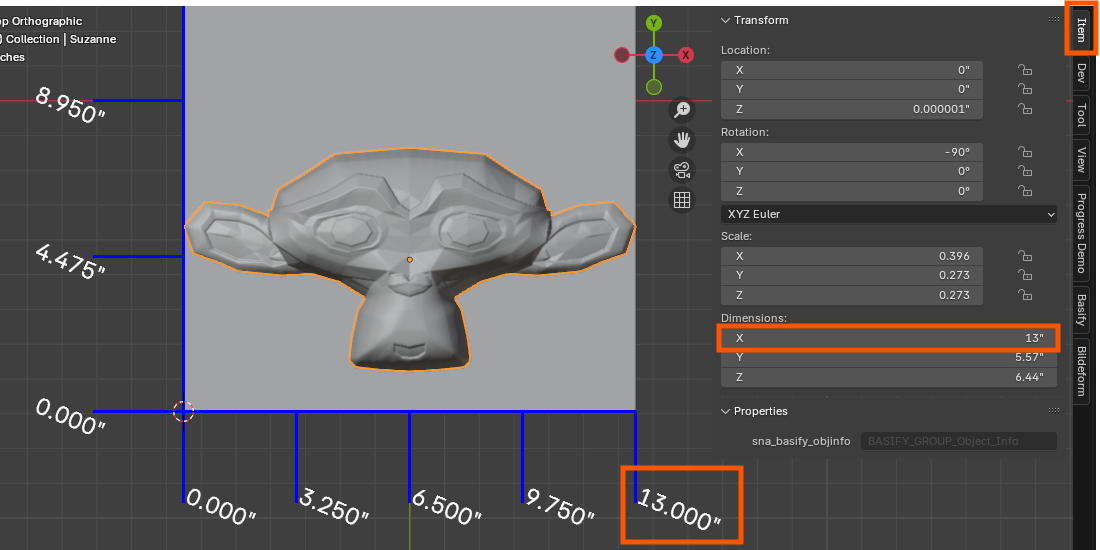
In the same side panel that the Basify tab is found, click the Item tab. At the bottom is a menu that lets you set the exact size of a selected object
Mesh Controller Parent / Child Hierarchy
When making a Mesh / Curve / Text a Basify object under Dynamic Relief Modifiers -> Meshes, you can only select one item at a time. However, any children of that object are also included as Relief Controllers. Any transformation (location, rotation, scale) applied to the parent is proportionally applied to the child too.
This lets you use complex multi-item setups (like a parent hand mesh, wearing a child ring mesh & holding a child wand mesh...) that all share a single Lattice controller.
How to set parent / child relationships
Mesh Data Linking
Using Edit / Sculpt mode lets you change a Mesh / Curve / Text. But it's hard to see the effects of this change, since the Object must be directly underneath the Dynamic Relief.
Data-linking allows a copy of the mesh to exist somewhere else in the Scene. Any change made to the linked copy affects the Relief too.
To enable, the Use Mesh Linked Copies option must be chosen after Basifying an object under the Dynamic Relief Controllers menu
Collection membership / names
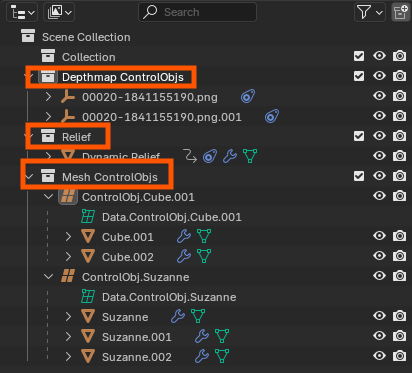
To work properly, Basify requires certain objects, collections, brush images, etc. to be have a certain name. Generally, any named object / collection / modifier that has basify / bsfy / ControlObj in the title should be left alone.
Additionally, certain collections to exist in the Scene & for certain objects to be members of only that collection. Collections & their membership is done automatically as new objects are created. You should not edit these properties.